")
The Monero blockchain has been forked into MoneroV, a private, untraceable, limited-time, and secure cryptocurrency. When MoneroV miners began to produce blocks on the MoneroV network, there was a chain split at block 1564965.
Quick of the guide:
- Mining Pools
- Configuring the Mining Software
- Pool Configuration
- CPU Mining
- GPU Mining – Nvidia
Let’s start mining some XMV now that we are informed about MoneroV!
How is MoneroV Different from Monero?
There are several differences between Monero and MoneroV, including the fact that MoneroV has a finite supply of coins while Monero has an infinite supply, and that MoneroV will introduce new protocols to address the scaling issues that currently plague Monero and other cryptocurrencies like Bitcoin.
Key Points Monerov Presents
• Max coin supply – Austrian school of economics principles
• Truly decentralized and private. Unlike Monero, there is no “face” of the project or coin.
• Change the PoW to reduce unethical mining (browser mining, botnets).
• development team working full-time.
• Blockchain scaling plans that are exciting.
• To Monero holders, the first cryptocurrency dividend.
Coin Info
Total Supply: Limited to 256 Million XMV, of which 5.85% was used in a Coinbase transaction for ongoing development.
10x the amount of circulating XMR was available at the time of the hard fork split, or 158 million XMV.
Proof of Work: CryptoNight v7
Every block is difficult to retarget. following the split, difficulty was adjusted.
Every two minutes is a block time.
Block Reward: Gradual decline. 6 XMV minimum per block at 184,467,440 XMV total emission until 256M maximum supply is reached.
Block Size: Dynamic.
Stealth addresses and ring signatures provide privacy.
Mining MoneroV
Mining Pools
A mining pool is our first necessity. You can solo mine, but the payouts could take months depending on how powerful your mining rig is, and the mining pools typically charge a very small fee (1% or less). You can get regular payouts, several times each day, by joining a pool. There are a few pools for MoneroV, but not many at the moment.
Regarding their amenities, they have a sizable pool and 1% fees. A direct connection to an exchange is also supported.

They also have a variety of ports to connect to:
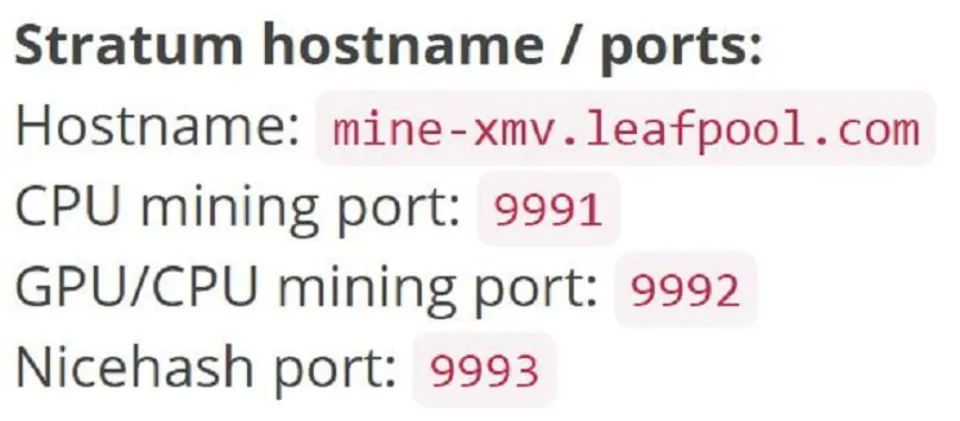
Configuring the Mining Software
We’ll be using xmr-stak for the tutorials on the CPU, GPU (NVIDIA and AMD), and GPU (AMD). It is the most adaptable, open source, and lets you mine using a combination of Nvidia and AMD GPUs as well as your CPU, all from a single window. Windows and Linux users can also use it.
The most recent version of xmr-stak, 2.4.3, is available for download at https://github.com/fireice-uk/xmr-stak/releases. This tutorial will use this version. If you must use Linux, you must download the source code and create the program. How to compile xmr-stak from source won’t be covered in this tutorial.
It will need a little configuration the first time you run xmr-stak. We will cover the initial configuration here, and then you can read about how to configure the miner in the section that pertains to you (CPU, GPU – Nvidia, and GPU – AMD)
When you first run xmr-stak, you will be presented with two cmd windows
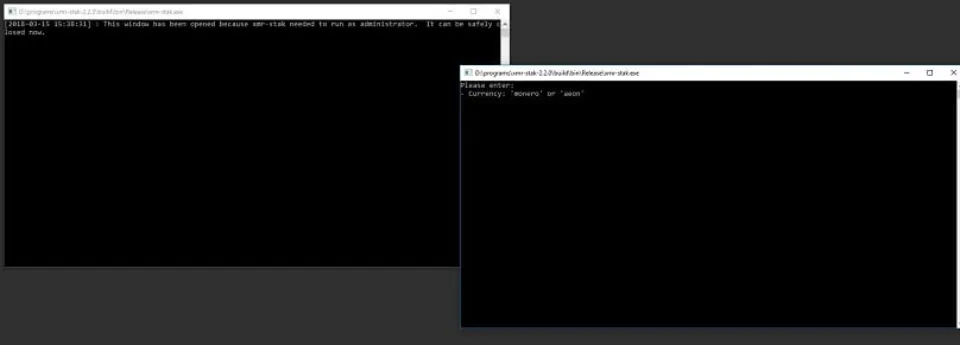
Close the window that claims to require administrator rights in order to operate.
Once the software has been initialized for the first time, a set of instructions will be presented to you. Once you have finished, you won’t need to do it again.
The initialization steps will ask the following questions:
Enter the port number where you want to use remote monitoring. On most home computer networks, 8000 or 3000 are typically available. Later, you can view your total speed and other detailed reports by entering the IP address and port you choose for your mining computer into a web browser on any other device connected to your network.
Currency: – You will want to type “cryptonight_v7”
The address and port of the pool you want to mine on are listed under “Pool Address.” For example, I typed in “mine-xmv.leafpool.com:9992”
Username: This serves as your wallet’s public key. You can type in a worker ID as well by using the format “public_key.worker_ID” An easy way to identify yourself on the pool’s dashboard is to simply give your computer the name “Worker.” I could use a gaming computer or an office computer, for instance.
For example, I would put 43H2t2kbaXbAunseiuCUBXZeuzGUqJon88LF8CrDHGRzJEaAGZHoLzPGd2PtijHqGMU5Xd2ZyC6BC1ifVFfeYJbyLy8Xt32.officecomputer
Password – type “x”
SSL support – type “n”
Do you want to use Nicehash – type “n”
Do you want to use multiple pools – type “n”
The software should now begin mining. Wait until it says “logged into mining_pool: port”, and then close the mining software. The miner should have created text files for your CPU and graphics card (Nvidia or AMD) if you look in the folder where it is stored. These files would have the names cpu.txt, nvidia.txt, and amd.txt. config.txt and pools.txt will also be created. We’ll demonstrate how to edit the txt files for each mining component in the following sections, as well as how to stop a particular GPU or CPU from mining.
Pool Configuration
Your pools.txt should now be set up, but I’ll also demonstrate how to manually set it up. Open the pools.txt and you should see something like this
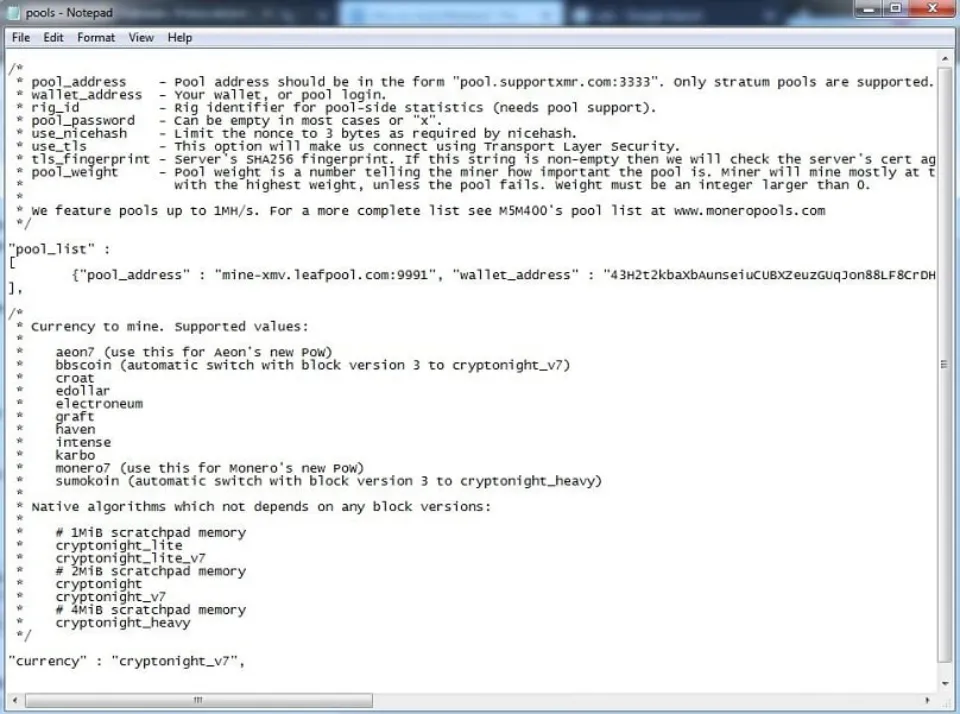
You would modify pool_address if you ever wanted to switch servers. You must edit wallet_address in order to switch wallets. Leave rig_id empty. Depending on how your pools are configured, modify pool_password.
Money is located at the very bottom. You need to inform XMR-Stak of the currency you are mining. They accept the majority of Cryptonight coins, so all you have to do is type the coin’s name from the list in the txt file. If the coin you want to mine is not listed, you must be aware of the algorithm it employs and use that name when mining the coin. If your coin has a whattomine calculator, it usually lists the algorithm on whattomine; if not, you can probably find the details on the coin’s website.
CPU Mining
The most profitable algorithm to use a CPU on for CPU mining is the Cryptonight algorithm. We have the choice of using xmr-stak or xmrig for CPU mining. xmr-stak only has precompiled binaries for Windows, whereas xmrig has them for both Windows and Linux. If necessary, you can compile them yourself to work with Linux because they both have the source code available.
You can download xmr-stak at https://github.com/fireice-uk/xmr-stak/releases
You can download xmrig CPU at https://github.com/xmrig/xmrig/releases
We’ll use xmr-stak for this tutorial.
We ought to be prepared to mine once we’ve finished the initial setup. The cpu.txt settings that xmr-stak made for us can be adjusted in order to achieve the highest hash rate.
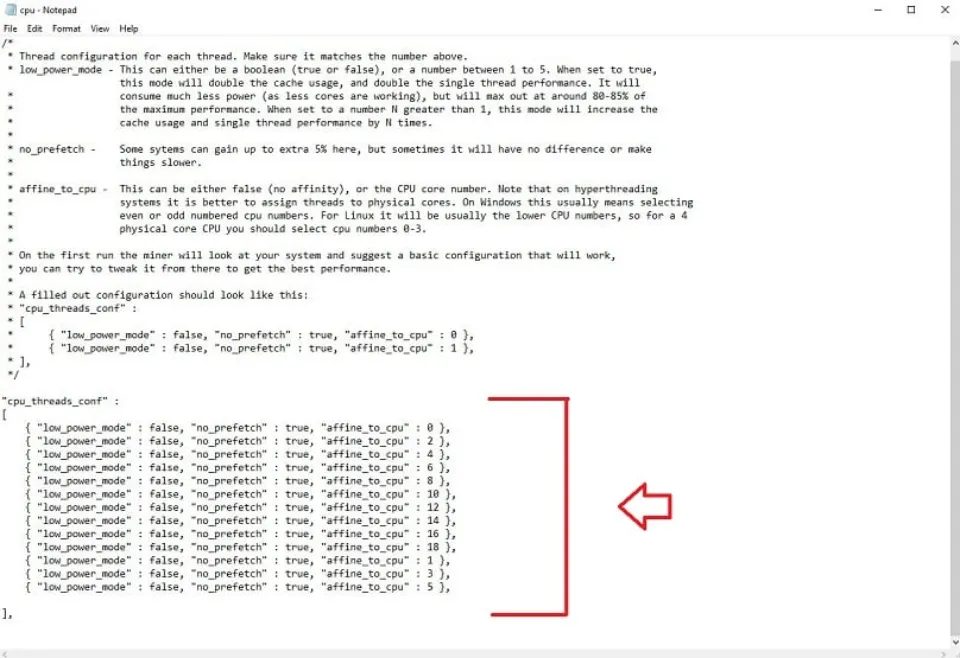
The program typically generates the ideal configuration settings automatically, at least for the CPU, according to our research. Each setting and suggestion for increasing performance are explained in detail in the cpu.txt file’s comments.
You must create a startup batch file to run the program after configuring the cpu.txt.
Just create a new batch file (or script file if using Linux) inside the folder where the miner is and paste this into the batch file
xmr-stak.exe optional_flags
Replace “optional_flags” with nothing if you want the machine to mine using the CPU and any other GPU in the machine, or the following
–noCPU By doing this, CPU mining will be stopped.
–noNVIDIA This will prevent mining on all of your system’s Nvidia GPUs.
–noAMD This will prevent mining on all AMD GPUs in your system.
For example, my setup is:
xmr-stak.exe –noNVIDIA
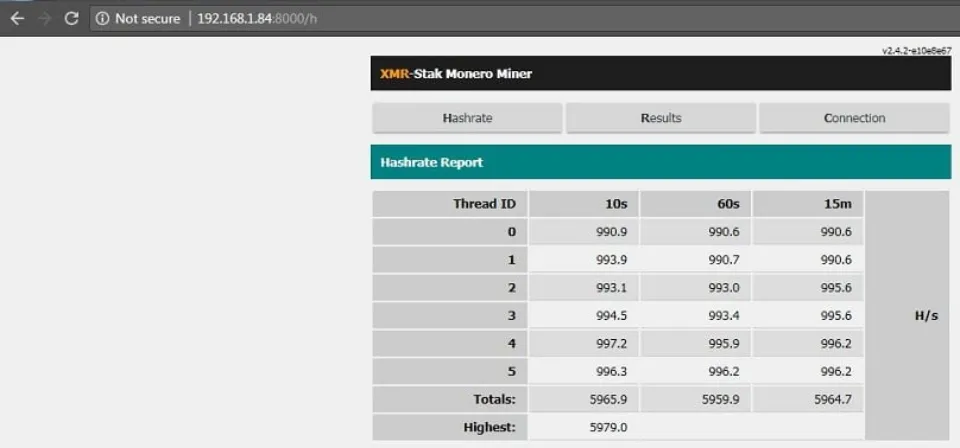
Double click the batch file to run the miner, and you should see something like this
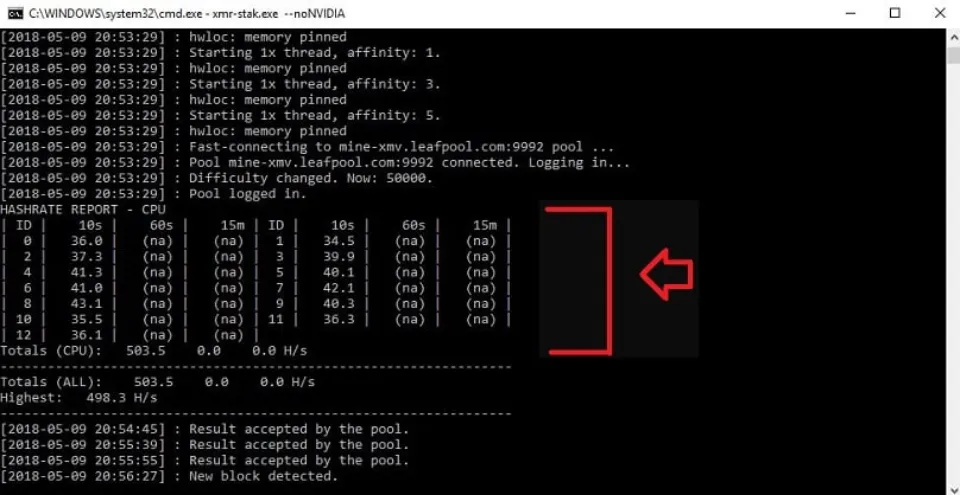
The 10 second, 1 minute, and 15 minute marks on the red arrow represent the system’s overall speed.
To view the total speed at any time, press the “h” key on the keyboard when the mining software is in focus.
GPU Mining – Nvidia
We can choose between using xmr-stak or xmrig for GPU mining with Nvidia GPUs. xmr-stak only has precompiled binaries for Linux and Windows versions are available through xmrig. Because they both have the source code, you can, if necessary, compile them yourself to run under Linux.
You can download xmr-stak at https://github.com/fireice-uk/xmr-stak/releases
You can download xmrig Nvidia at https://github.com/xmrig/xmrig-nvidia/releases
We will use xmr-stak for this tutorial.
We should be prepared to mine once the initial setup is complete. To get the highest possible hash rate, one thing to try is to modify the nvidia.txt settings that xmr-stak made for us.
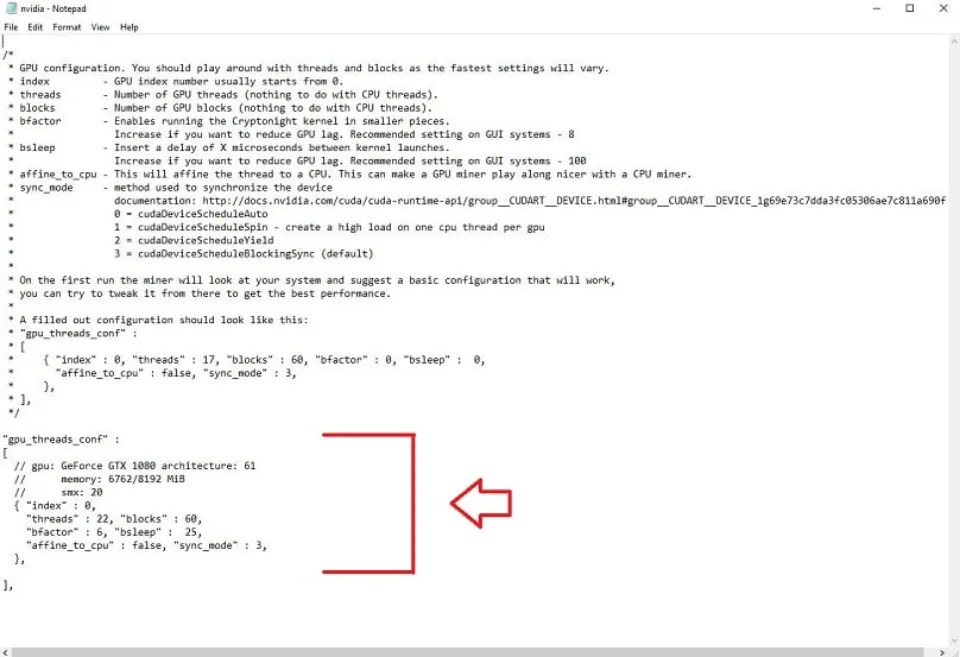
We discovered that you can adjust the settings for the GPU to get a little bit more performance, but generally the program typically generates the best configuration settings automatically. Each setting is thoroughly explained in the nvidia.txt comments, along with suggestions for how you might try to maximize your computer’s performance.
You must create a startup batch file to run the program after configuring the nvidia.txt.
Just create a new batch file (or script file if using Linux) inside the folder where the miner is and paste this into the batch file
xmr-stak.exe optional_flags
Replace “optional_flags” with nothing if you want the machine to mine using the CPU and any other GPU in the machine, or the following
–noCPU The CPU won’t be able to mine anymore.
–noNVIDIA Your system’s Nvidia GPUs won’t be able to mine anymore after doing this.
–noAMD This will prevent mining on all AMD GPUs in your system.
For example, my setup is:
xmr-stak.exe –noCPU
Double click the batch file to run the miner, and you should see something like this

The red arrow displays the system’s overall speed every 10 seconds, 1 minute, and 15 minutes.
To view the total speed at any time, press the “h” key on the keyboard when the mining software is in focus.
General Troubleshooting
Stale or rejected shares are one thing to keep an eye out for. You might want to try a server that is closer to you if you notice a lot of stale shares. If there is a way to do so, try reducing the miner’s intensity if you notice a lot of rejected shares.
Summary
You can now begin mining MoneroV after completing this. To keep track of your statistics, enter your public key into the dashboard of the mining pool.
FAQ
How Much XMV Will I Earn Per Day?
All you need to do is type in the sum of the speeds of all the computers you use for XMV mining. For example I would enter 5.975 KH/s you can also switch the calculator to H/s so I would enter in 5975 H/s
It indicates that I will receive about 6.31XMV daily.